Weather and age will take a toll on every plastic vent, appliance cover, or breather that may protrude through (or is mounted on) the roof of your RV.
Over time, ultraviolet rays beating down on your RV’s roof will cause the plastic vents to deteriorate to the point that a simple brushing by of a small branch will cause them to crumble away into dust.
Hail storms have broken more rooftop fixtures than anything else. It happened to us on a trip out west. It was just one of those chance things when nickel-sized hail took out the bathroom vent on our travel trailer. Age wasn’t an issue this time, it was less than a year old.
What damaged the vent isn’t that important; what matters is that exposure to the elements will take a serious toll on your RV unless you replace the broken item before the next rain storm.
Here’s how to replace old RV rooftop fixtures…
Replacing RV Rooftop Vents
Crank-open roof vents are the easiest.
There are 3 or 4 different manufacturers, so taking what’s left of the broken one with you will guarantee you get a proper replacement at the RV dealer. This may be a good time to explore your options, because you can get replacement vents in either smoked or translucent material.
Installation is usually a matter of removing a hinge pin or two and hooking up the pivot point to the mechanism that raises and lowers the cover. You don’t have to remove the whole vent structure, only the lid.
Another great option is to add a MaxxAir cover over the entire vent. You will still need the replacement vent cover, but the Maxxair vent cover will allow you to leave your roof vents open — even on rainy days. This will help to maintain a lower interior temperature, especially while the RV is not being used or when it’s all closed up. Plus Maxxair covers are much more heavy duty and will survive most impacts.
Yet another option is to install a metal roof vent cover. It is impervious to hail and will last forever.
Rooftop Air Conditioner Vents
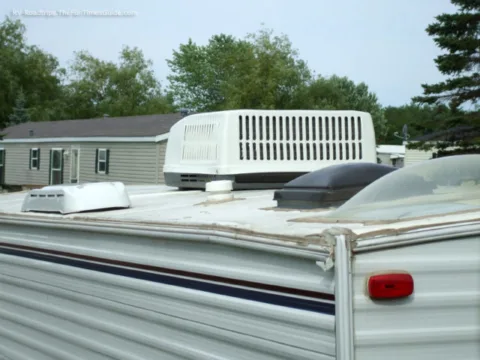
Air conditioners stick up high enough to become the highest point of the RV. That means they are the first obstacle when going under low-clearance obstacles.
The original air conditioner vent is plastic, and if that’s all you damaged, then a replacement can be ordered at the RV dealer.
In some instances, a suitable metal enclosure can be ordered — providing more substantial protection from low-hanging branches.
Installation is a matter of using a half dozen screws to secure it to the main structure of the AC unit.
RV Refrigerator Vents & Sewer Breathers
Refrigerator vents and bathroom sewer breathers are 2 items that take a bit more work, as they become part of the roof itself.
Once they’re mounted, the attaching screws and seams are thoroughly sealed with a self-leveling sealer that sets up to form a strong though flexible bond. It’s good for keeping water out over the long haul, but removal can be a tedious process.
When you remove the broken refrigerator vent or breather you must remove all of it. That includes the flange mount portion that is embedded in sealer. You must also remove as much of the old sealer as possible, in order to provide a good surface for the new replacement fixture.
Refrigerator vents and sewer breathers are usually in stock at the RV dealer. They don’t have to be identical to what you have — they just need to be functional and allow air to pass through.
Final Thoughts…
If you notice that one item on your RV’s roof is damaged, then take the time to check all the roof vents. Typically, sun damage will have them all crumbling away about the same time.
And while you’re buying your new vents be sure to pick up at least one tube of Flow-Seal self-leveling sealer. This is great stuff that I can personally vouch for. It will do a great job in sealing roof-mounted vents.
To help you carefully carve away the old sealer, a heat gun or powerful hair dryer may be useful. Be very careful while cutting out the old sealer, you don’t want to puncture your rubber roof membrane in the process. Remember, the whole point of this project is to stop water from getting in.
Once you have the new rooftop vents in place, run a generous bead of the Flow Seal caulk completely around the mounting flanges, making sure to cover all screws and the perimeter seam where the vent meets the rubber roof. This isn’t the time to skimp; make sure you seal it completely.
While you’re on the roof, check around any antennas and along all roof seams for cracking or separating. Give the roof a good inspection so you don’t have to go back in a couple months and replace another vent. Remember, an ounce of prevention is worth a pound of cure. When it comes to water leaks, the damage can be very expensive.
I’ve been involved in RVing for over 50 years — including camping, building, repairing, and even selling RVs and motorhomes. I’ve owned, used, and repaired almost every class and style of RV ever made. I do all of my own repair work. My other interests include cooking, living with an aging dog, and dealing with diabetic issues. If you can combine a grease monkey with a computer geek, throw in a touch of information nut and organization freak, combined with a little bit of storyteller… you’ve got a good idea of who I am. To date, I’ve shared my RV knowledge in over 300 articles here at The Fun Times Guide! Many of them have over 25K shares.


