Okay, you’ve filled up the RV water tank and hit the switch to pump the last of the antifreeze out of the plumbing lines.
The only problem is… the RV water pump just keeps running and won’t shut off. The water flow is only a matter of a few drips at best.
Now what?
How To Diagnose A Water Pump Problem
The first step is to eliminate the obvious.
Are you absolutely sure there is a supply of water getting to the pump? Silly things like “you left the drain open when you thought you were filling the tank” have fooled more then one person into thinking their RV water pumps were bad.
If you disconnected the line from the tank to the water pump when you pumped RV antifreeze through the water lines last fall, has everything been reconnected correctly?
Is there a shut-off valve you forgot to open?
If your pump never made any noise at all when you hit the switch, lack of electricity may be a concern. Check the fuse in the 12-volt panel. If it’s good, check for power at the fuse with a volt meter or a test light.
Must read: The Difference Between A Voltmeter And A Multimeter
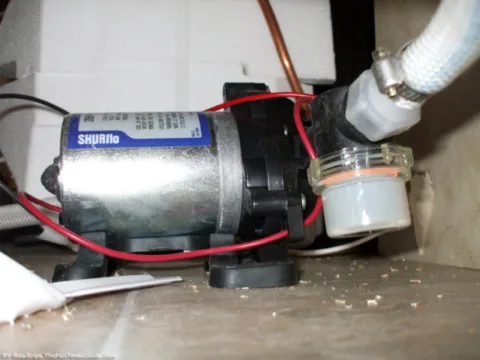
Next check for power at the pump itself. If 12 volts are present at the pump, one last check should be made before you declare the pump bad: Check the ground for the pump motor. If the pump isn’t grounded, the presence of 12 volts will mean nothing. It takes a good ground to make the circuit.
Replacing An RV Water Pump
Once you have determined that yes, indeed, there is a water pump problem:
1. Drain the fresh water tank.
2. Disconnect the water lines. (But have a couple of towels handy, as there will still be a bit of water in the lines that may run out.)
3. Disconnect the electrical connections.
4. Unbolt the RV water pump from its mounting
5. Bring the water pump itself out to the work bench.
All of this sounds very easy, and in theory it is.
There may be one tiny problem: If your RV water pump is mounted like the one in my travel trailer, you may have to be a 60 lb skinny-as-a-rail contortionist to physically reach all the connections required to remove the RV water pump. There may be a removable access panel that will help you get at it, but most likely, it’s just going to be awkward and a bit of a pain.
How To Install A New RV Water Pump
There are 3 or 4 different brands of RV water pumps on the market.
Some have rebuild kits available, though most would be considered throw away items. With a wide selection of models available from $60 to about $150, it may be wise to just install a new pump and be done with it.
Installing a new RV water pump is as simple as remounting the pump, and reinstalling the water lines.
Be sure to use teflon tape on any pipe thread connections.
Pay attention to arrows on the water pump housing indicating which port is the “in” or “out”. (They may be labeled as well.)
Carefully read the instructions supplied with the new pump and you’ll be up and running in no time.
Why Do RV Water Pumps Fail?
For the most part, 12-volt electric water pumps have proven to be quite reliable and long lasting.
The main reason for RV water pump failure (as with all RV water system components) is being left for the winter with water in the system. Extensive periods of storage in hot summer weather down south may also shorten the lifespan of an RV water pump.
Here are some more RV water pump problems & solutions.


