Water damage will take the value out of your RV faster than anything I know.
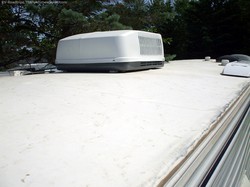
 It’s an absolute must that at least once a year you take an up close and personal look at the roof of your RV trailer or motorhome in order to inspect the condition of the rubber membrane and all possible places water can penetrate the structure.
Furthermore, if you even suspect that a low hanging tree branch or other protruding obstacle has rubbed along or poked at the roof, you really need to get a ladder and check it out.
The results of ignoring such an occurrence will cost you big money if the damage isn’t taken care of immediately. It’s simply a fact of RV ownership that you need to inspect, clean and sometimes repair the rubber roof on your RV.
Rubber roofs are made from Ethylene Propylene Diene Monomer (EPDM).
Made to last 20 years, EPDM usually carries a 10 to 12 year warranty.
Over time, the roof will develop a chalky surface which is reassuringly normal wear. Even after 10 years, this chalking will only affect about 10% of the roof’s original thickness.
Cleaning Your RV’s Rubber Roof
Regular cleaning will help reduce the amount of chalk buildup and help prevent the white stains seen on the sides of many older RVs.
There are a number of manufacturer-recommended rubber roof cleaners that can be used, though all manufacturers generally agree that a mild laundry soap is also a safe cleanser. It is particularly important that you follow the instructions provided by your RV’s manufacturer, because solvent based or abrasive cleaners may permanently damage the material.
Repairing A Damaged Rubber Roof
Rest assured, if a tree branch punctures or rips the rubber membrane, all is not lost.
Camping World offers an Emergen-c Rubber Roof Repair Kit which includes a 4’x3” length of material and the proper adhesive and sealer to make the repair.
There are also a number of other rubber roof patch kits available. Again, be sure to follow all instructions carefully and only use this or similar manufacturer accepted repair materials on your RV’s rubber roof.
Another product that works well is EternaBond. It’s a sealing tape that is stated to seal between a number of different materials. It can also be used for such things as repairing a cracked water tank.
Don’t Forget The Rubber Roof Seams And Seals
 Keep in mind that more than simply the integrity of the roof material needs to be inspected.
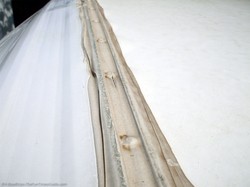
All seams are a potential source of leaks. The area where the rubber roof meets the front and rear edges of the roof is probably covered with a sealing caulk. Around any items such as sewer vents, refrigerator vents or ventilation covers, a sealing caulk has been applied to prevent water infiltration.
A self-leveling sealant is commonly used for sealing over all roof joints. Dyco Flow Seal Caulk is one of the best. It comes out of the tube rather runny, settles over the whole seam area, then sets up to a long lasting hard rubber consistency that will protect the area from water.
Over time, as the caulking material ages, cracks can develop. By inspecting all seams every year, you can catch this cracking before it gets deep enough to cause a leak. A simple touch-up with a tube of sealer will assure no water gets into the structure.
Rubber roofs have proven to be an easily maintained long-lasting roof system. With a history of over 20 years of successful use, you will find rubber roofs on practically all RVs today.
Their durability and the ease with which they are repaired will assure that rubber roofs will continue to play a vital role in the RV industry for many years to come.


