Hydraulic leveling jacks on a motorhome can become a critical system when you least expect it.
You may think they are just a convenience item — because normally they just firm up the RV and level out your position so that the refrigerator operates properly.
But they really prove their worth when a wind storm comes up, or you need to get a wheel off the ground.

Having the RV leveling system shut down because the low battery indicator came on (when you know full well there is plenty of 12-volt DC power available) can put you in a bad spot real quick!
While the word “computerized” is likely to put fear into your mind when it comes to making repairs to your RV. Surprisingly, a problem with the RV levelers is just a simple problem that can be relatively easy to fix.
My own experience showed me that all it takes is a little persistence and a volt/ohm multi-meter to repair RV leveling jacks.
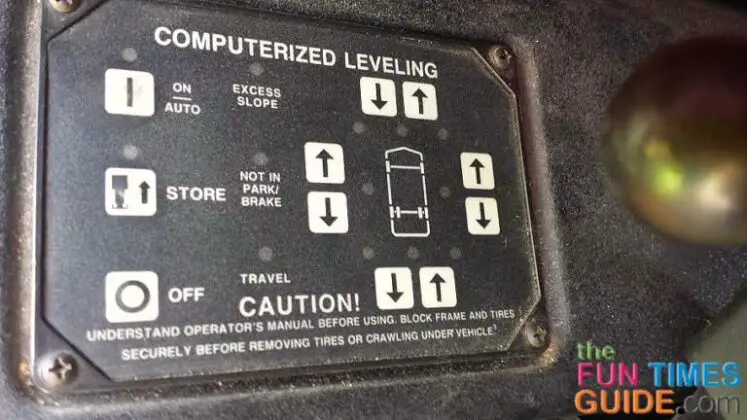
Low Battery Light On?
You know you have a problem when, upon pressing the ON button to lower the spring-retracted jacks, the low battery light comes on and the system goes completely dead.
Having the engine running and the battery indicator showing somewhere around 13.8-volts DC confirms there is plenty of power available — only it isn’t getting to the system.
Online research told me a bad ground at the control module is a common problem.
My installation had the control module located in the electrical compartment at the rear of the RV. The ground wire is simply attached with a screw into the top of the compartment — which is made of aluminum and is grounded to the frame.

How To Find The Source Of The Problem
Using the multimeter, I confirmed it was a good ground. And while I was at it, I confirmed all the other plug-in connections were solidly installed.
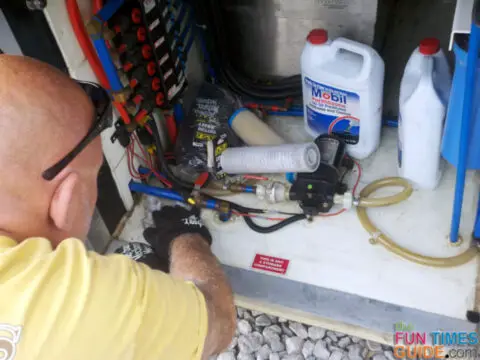
Of course this didn’t fix anything — so I continued on to the hydraulic pump/control valve located behind the last locking panel at the rear of the RV.
When trying to understand what seems like a complicated mass of electrical wiring, remember that most often the problem is very basic. Start from the power source and verify that you have voltage at every step along the path. Most failures are due to minor corrosion or a loose connection.
Here’s how I did it, step-by-step:
- Battery power comes into the system through 2 relays and it continues to the motor that drives the hydraulic pump. My motorhome is 22 years old — so removing each connection and cleaning it thoroughly with sandpaper or a file was the best way to track down the offending connection.
- After cleaning all battery cable connections, I was able to confirm that power was coming into the relays but not continuing on to the hydraulic pump motor when the system was operated. The 2 relays were not engaging.
- I unbolted the pump assembly, so I could turn it — giving me a better view of the smaller electrical connections.
- I found that a ground wire had corroded and fallen off — so power was coming to the 2 relays, but without a ground they didn’t energize.
- I replaced a section of small wire (that was both overheated and corroded) and grounded it to a convenient screw. I couldn’t see where it was originally connected and thought it didn’t matter as long as it was grounded to the frame.
This made the “low battery” indicator to go out, but the system still didn’t function.

How To Fix The Problem
So I followed the ground wire physically back from the relay. I discovered it originally went through a high pressure shut-off switch mounted on the back side of the hydraulic valve assembly. This means in the event of a dangerous high pressure situation, the power to the 2 relays is cut off and the system shuts down.
The ground wire to the relays can only be attached to its original point of ground. That is the negative terminal on the end of the electric motor that powers the hydraulic pump. The pump motor assembly does not provide the ground for the motor — even though it is bolted directly to the frame of the motorhome.
I firmly believe the system is engineered with an inadequate gauge of wire providing the ground for the pump motor. The positive lead is a good-sized battery cable, while the negative terminal is a much smaller size wire — similar to what goes to tail light wiring. The heavy draw from the pump heats up this connection and, over time, this sets up corrosion at the connection.
Once the rust was cleaned off and the burnt wire replaced, my RV leveling system is back up and running.
Because of this design, it’s likely other RV owners will experience the same issue at some point. Don’t be intimidated by the complex diagrams in the manual. Just take your multimeter and follow the power from start to finish and you will find the problem.
More DIY Repair Tips For RV Leveling Jacks
- HWH RV Leveling System Tech Tips
- Video: How To Repair Hydraulic RV Leveling Jacks
- HWH Hydraulic Leveling System Replacement Parts
I’ve been involved in RVing for over 50 years — including camping, building, repairing, and even selling RVs and motorhomes. I’ve owned, used, and repaired almost every class and style of RV ever made. I do all of my own repair work. My other interests include cooking, living with an aging dog, and dealing with diabetic issues. If you can combine a grease monkey with a computer geek, throw in a touch of information nut and organization freak, combined with a little bit of storyteller… you’ve got a good idea of who I am. To date, I’ve shared my RV knowledge in over 300 articles here at The Fun Times Guide! Many of them have over 25K shares.