What a mess when you turn on the water pump and immediately see water running out onto the floor! (This is most likely to happen when you’re getting ready for your first RV outing after a long cold winter.)
If you see the water running out, then you’re ahead of the game — because you know where to look. If the water pump keeps on running, or pulses on and off continually, then you still have a leak. It may just take a bit more effort to find the problem area.
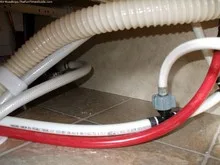
With a thorough search inside cabinets, outside storage spaces, or even under your RV, you can usually find the problem area. Removable panels will allow access to the plumbing behind the shower faucet and the area around the water heater. Sometimes, as in our Dutchman 18B travel trailer, there are water lines running along the inside — under the bed storage area.
Once you have located the spot where water sprays out, it’s time to determine what type of fittings or hose will be needed to make the repair.
Types Of Water Lines
If the split is in a water line, you probably have either of 2 types of water line:
- Copper lines are seldom used in today’s RVs. They can be found in older units dating back to the 60’s or 70’s.
- Today, plastic is the material of choice for RV water lines.
How To Repair The Water Line
When water lines freeze and split, you will be left with a cut in the line — possibly as long as an inch or so. Usually there is enough slack or movement in the line to allow you to cut out the damaged section containing the split. Then, you can rejoin the two ends with one fitting.
If the damage requires you to take out a longer section of water line, then you will need 2 fittings and a similar length of replacement water line to make the repair.
Cutting copper lines will require a tubing cutter so you don’t deform the tube. A utility knife will allow you to cut plastic water lines. In either case, cut out only a section large enough to remove the damage.
Types Of Fittings
A compression union fitting is the best choice when reattaching the 2 good ends of the water line. You could also take your small damaged section of water line with you to the hardware store (or RV dealer if it’s closer), and they can fix you up with the proper fitting. Installation will require a couple wrenches. Or, in the case of plastic fittings, probably a pair of pliers will take it beyond hand tight securing a good connection.
Often, water can get trapped in an elbow fitting when a low spot is created. The split or crack can be hard to see, but as soon as you turn on the water pump, water will spray everywhere.
Elbow fittings can be both compression style and pipe thread (where they screw into another fitting or appliance). Again, the best way to assure that you get the correct fitting is to remove the damaged item and take it with you to the store to find a suitable replacement.
When replacing pipe thread fittings, be sure to wrap the threaded portion with a couple layers of Teflon tape before screwing them in place. This will help to prevent the fitting from leaking under pressure. Compression fittings don’t require any additional sealant; the act of compressing the parts together is all that is required to give a good watertight connection.
Sometimes finding the exact replacement fitting may be a little hard. Depending on your mechanical ability, a little “outside the box” thinking may be required to re-plumb the problem area in a different manner using different fittings. When it comes to RV plumbing, there are usually 2 or 3 ways to get the job done. Rely on the help of store personnel to help you come up with a workable solution.
Even the best efforts to properly winterize an RV can leave water in unexpected places. A water line leak isn’t the end of the world, but it is a problem that must be addressed immediately, before water leaks into the structure doing thousands of dollars worth of damage.

