Our recent purchase of a pre-slide out motorhome reinforced the fact that empty space is a valuable asset onboard an RV.
For example, the living room barely allows for people sitting on the sofa to avoid knocking knees with anyone sitting in the recliner across the aisle.
This being a higher-end coach in its day, some 20 years ago, it’s equipped with a few amenities that aren’t necessarily appreciated by everyone. For us, the standalone icemaker is one such appliance. Being the size of a small refrigerator, we just wanted it gone.

Here’s how I removed it…
How To Remove An RV Ice Maker
Removal of an RV ice maker is pretty straightforward.
In this case, the only electrical connection was a simple plug that came out the side of enclosure and plugged into a nearby outlet. Once unplugged, there was no danger of shock. The only other connection was a waterline coming up through the floor under the ice maker.
There were about a half dozen screws around the perimeter flange of the icemaker holding it in place within its cabinet.
What I didn’t expect was the factory had installed the icemaker first and installed the carpeting later. This made it impossible to slide out the appliance from its tight-fitting home inside the cabinet.
To make room for removal, I cut 2 slices in the carpeting with a utility knife. My plan is to replace the RV carpeting with new flooring, so care in how I made the cuts wasn’t important. If replacing the carpet isn’t in your plan, you could be more forceful about removing some of the cabinet material that may be interfering with removal.
Here are before and after photos:


Once the icemaker was almost out, I disconnected the ¼-inch waterline from the machine. I could then finish sliding it out and then remove it from the motorhome.
Removal of the cabinet required unscrewing 6 or 8 more screws that held it both to the floor and to the wall.
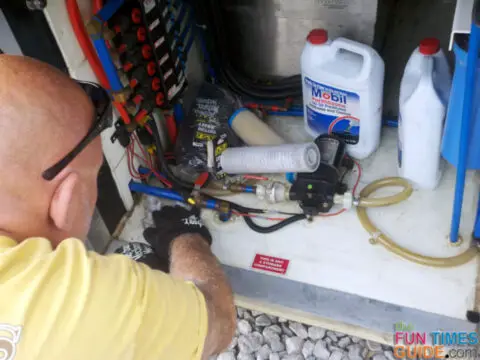
How To Remove The Waterline
With the RV ice maker removed, the last item to contend with is the waterline.
You may be tempted to just cap it off. Or if it’s copper, you might consider pinching and soldering the end of the tube since it will be hidden under the floor and no longer will be of any use.
Big mistake!
Remember, when winter comes, ALL waterlines must be drained or pumped full of antifreeze. By capping off the offending line, there would be no way to remove the water trapped within. So you must follow the line back to its origin and disconnect it from its source of water.
In this case, it ran under the floor over to the kitchen sink, and was Tee’d into the output of the drinking water filter system installed next to the sink. It makes sense that the supply to the ice cube maker would be the same filtered drinking water you would get separately from the sink faucet.
Once disconnected at the Tee, I replaced the Tee with a compression fitting splice. Then the tubing that was no longer needed was cut off at the floor and tucked out of the way.
You May Find Other Small Things In The Process
I noticed some mouse droppings near the opening under the kitchen sink, so I took the time to cover the hole with a piece of plywood. A tin patch was installed over the smaller hole where the tubing came out of the living room floor.
Now the recliner is moved closer to the passenger’s seat, creating more room near the door and also providing more knee space for those sitting on the sofa.
Here are before and after photos:


In this instance, the original carpeting was cut out around the enclosure. The scrap was reinstalled under the RV ice maker. This would leave a damaged area where the appliance was located, so take this into consideration if you decide to remove your unwanted icemaker.
I’ve been involved in RVing for over 50 years — including camping, building, repairing, and even selling RVs and motorhomes. I’ve owned, used, and repaired almost every class and style of RV ever made. I do all of my own repair work. My other interests include cooking, living with an aging dog, and dealing with diabetic issues. If you can combine a grease monkey with a computer geek, throw in a touch of information nut and organization freak, combined with a little bit of storyteller… you’ve got a good idea of who I am. To date, I’ve shared my RV knowledge in over 300 articles here at The Fun Times Guide! Many of them have over 25K shares.